How it works #
This guide will provide step-by-step instructions on how you can set up your Data Talks Web Tracking using Google Tag Manager (GTM). First, you need to create and configure your domains and GTM containers in the CDP, and then finish the configuration in GTM.
In this guide, we are going to:
- Create a new Google Tag Manager container for your websites
- And then attach the Data Talks web tracking solution to capture Page View events.
In addition, the document provides you with the optional configuration required in order to capture the email of a logged-in user, and then collect information from web contact forms.
Requirements #
- Google Account
- Add the container code into your website
- Capture email address (optional)
- Add the Data Layer code into your website
- Provide the required values to the Data Layer
Step 1. Create Google Tag Manager Account #
If you already have a GTM account, please go straight to Step 2.
- First, go to https://tagmanager.google.com to start the setup for the Google Tag Manager (GTM) and login with your Google credentials.
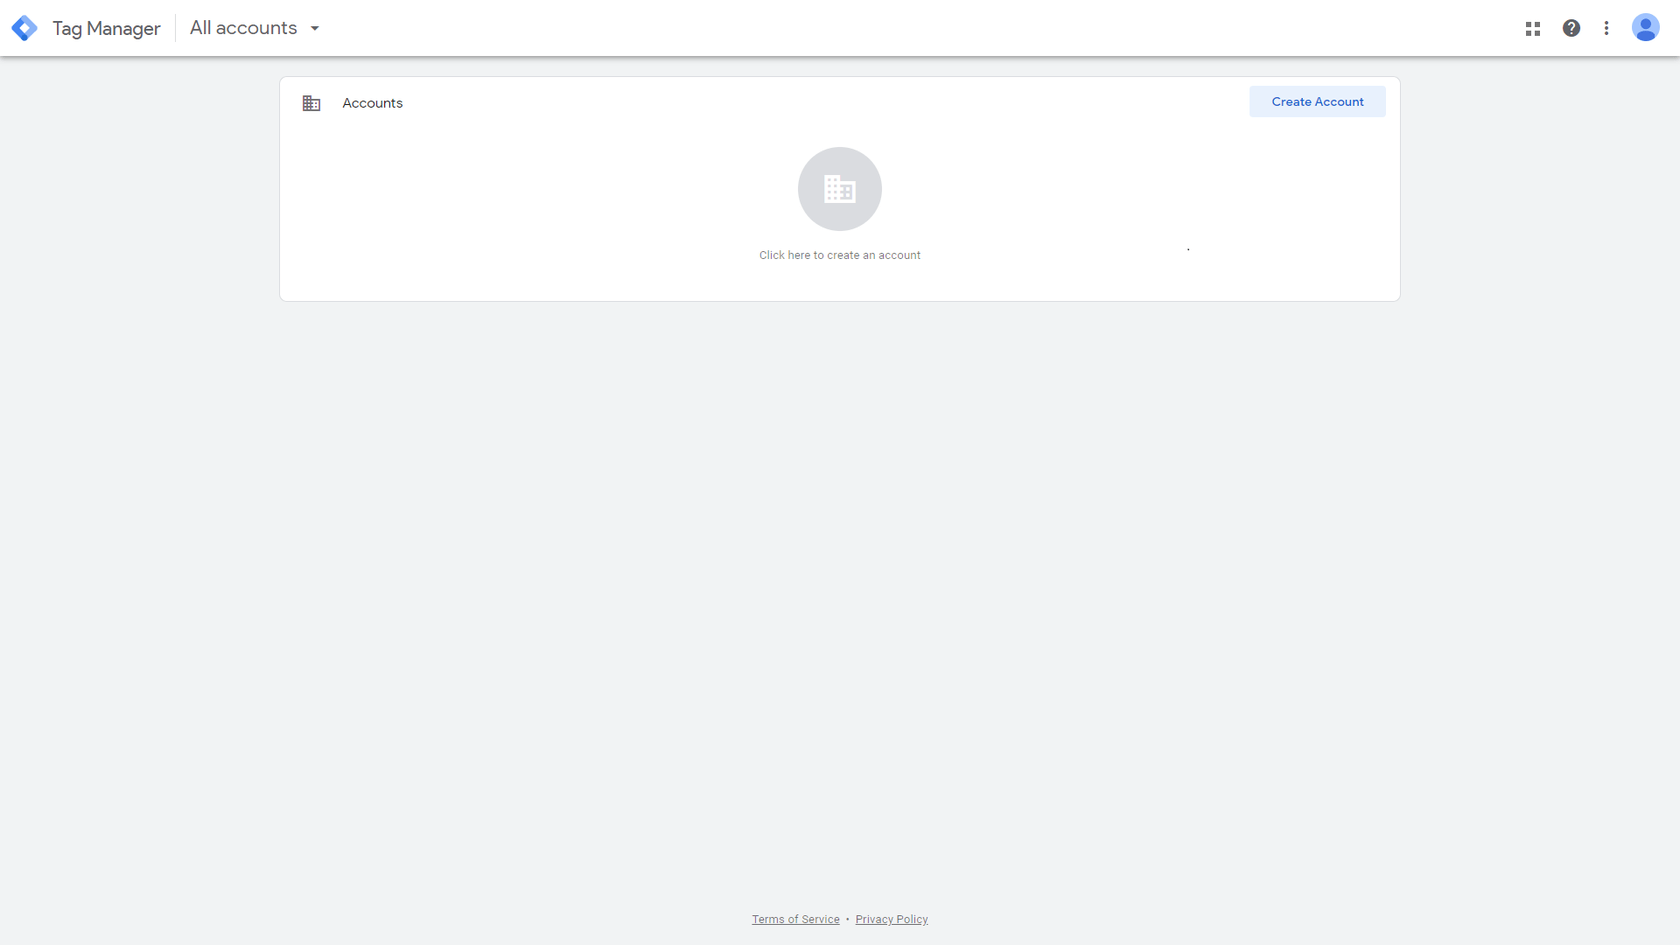
- After logging in, you need to create your account in GTM. NOTE: If you already have a container created for your account, you can skip this step and proceed directly to “The Setup process” below.
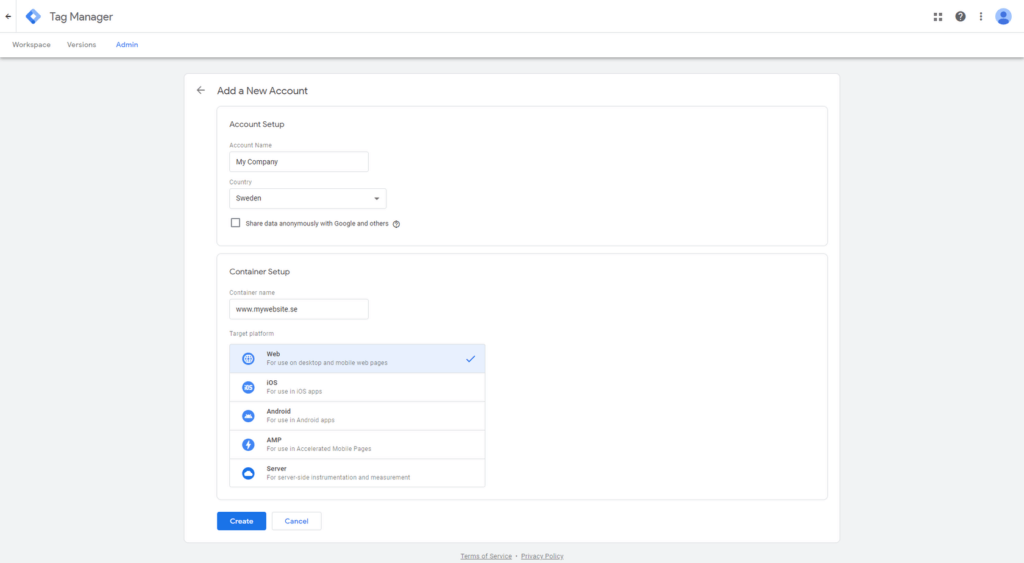
- Fill out the Account Name, Country and Container Name fields accordingly. We will choose “Web” as the Target Platform.
- Accept the Data Processing Terms by marking the checkbox at the bottom left and then Accept the GTM Terms of Service by pressing the Yes button on the top right corner.
Step 2. Data Talks Web Tracking for your Domains #
If you finished your Google Tag Manager setting, there are only a few steps left. Let’s go to the Web Tracking Deployment page which you can find in the admin section of the CDP.
- Click the Configure New Domain button.
- Fill in the Domain Name and GTM Container ID.
- Domain Name: This is the URL you are going to use to track web behavior. It is required to be written with a valid format of HTTP/HTTPS URL!
For example: https://www.example.com - GTM Container ID: This is the ID of your Google Tag Manager account. You can find it after you have created an account on: tagmanager.google.com. The account is required to be written in a valid format which starts with ‘GTM-‘ and is followed by characters. The characters can only include uppercase alphabetical letters and numbers.
For example: GTM-12EXAM3
- Domain Name: This is the URL you are going to use to track web behavior. It is required to be written with a valid format of HTTP/HTTPS URL!
- Register the new domain by clicking Save Changes.
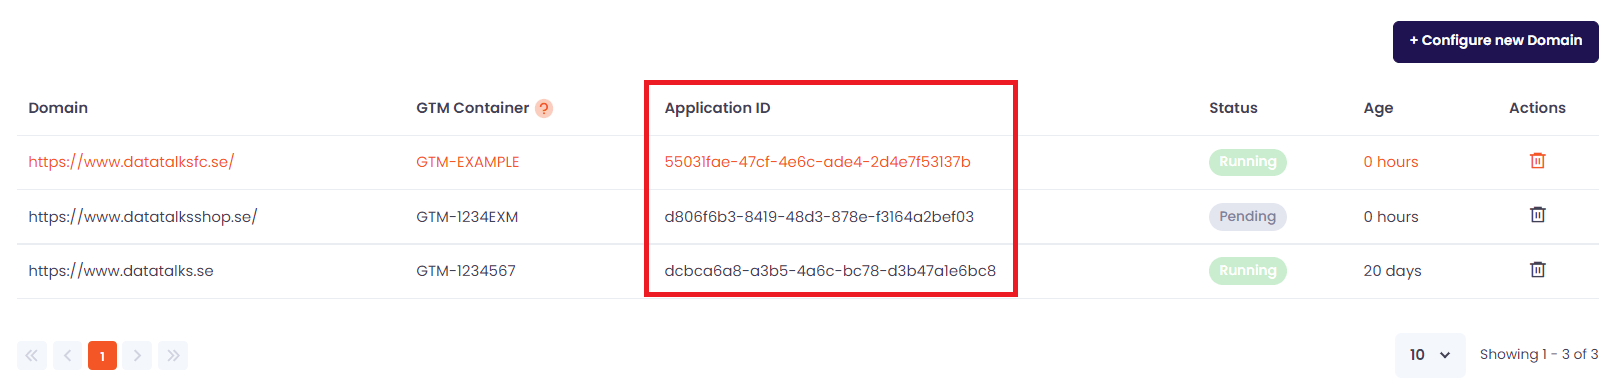
The portal will create an Application ID for each domain automatically which you will use inside GTM when configuring your websites.
Now you can see the list of the domains you registered, delete each domain, and check their tracking status and the application ID created for each domain. You can use the application ID for the final changes explained below.
Step 3. Finish the Setup of your Google Tag Manager #
3-1. File Upload #
In order to make the GTM configuration as easy and fast as possible, use the attached .json files. They contain a template container configuration. By importing them to your GTM container, you are then able to set up your web tracking in just a few clicks. Continue to follow this guide to set it up correctly.
Choose one of the following files to upload to your GTM account based on what your would like to track. The basic configuration is “Pageviews” which includes regular web behavioral tracking. On top of this, you have the option to track page Login events and Contact form submissions.
In case you would like to modify your configuration in GTM at a later point, you need to delete the existing configuration and add the new file.
Files List #
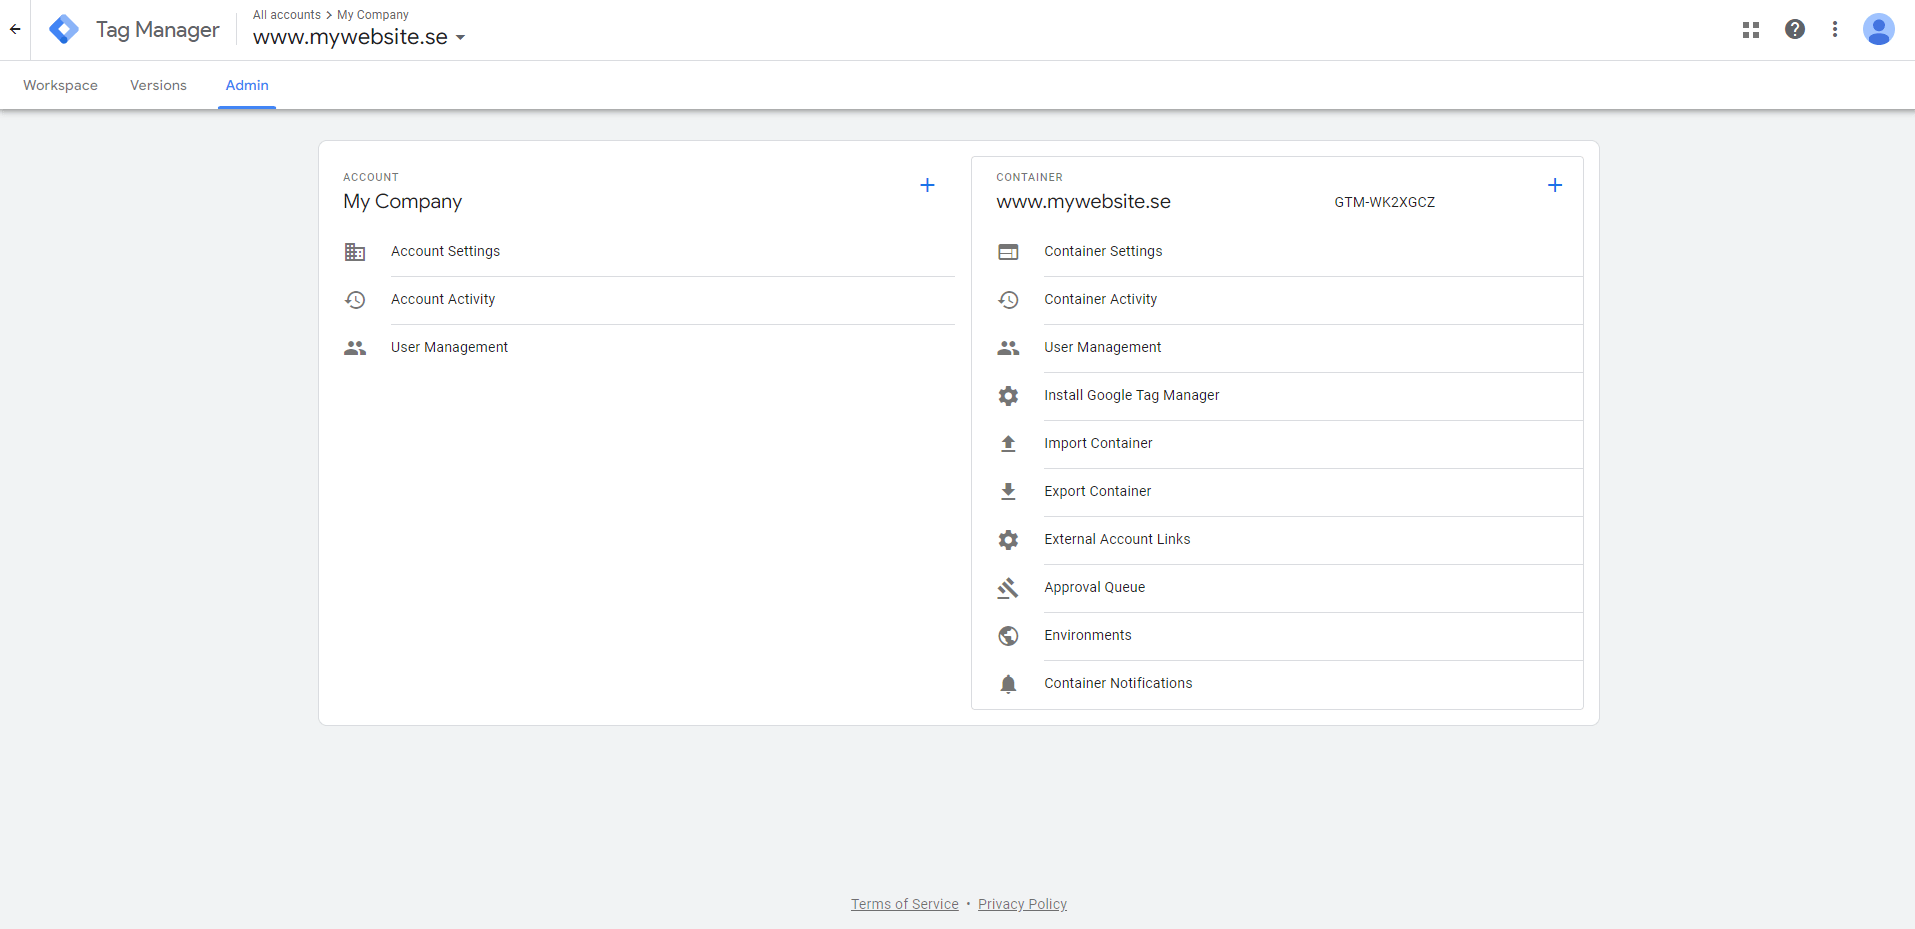
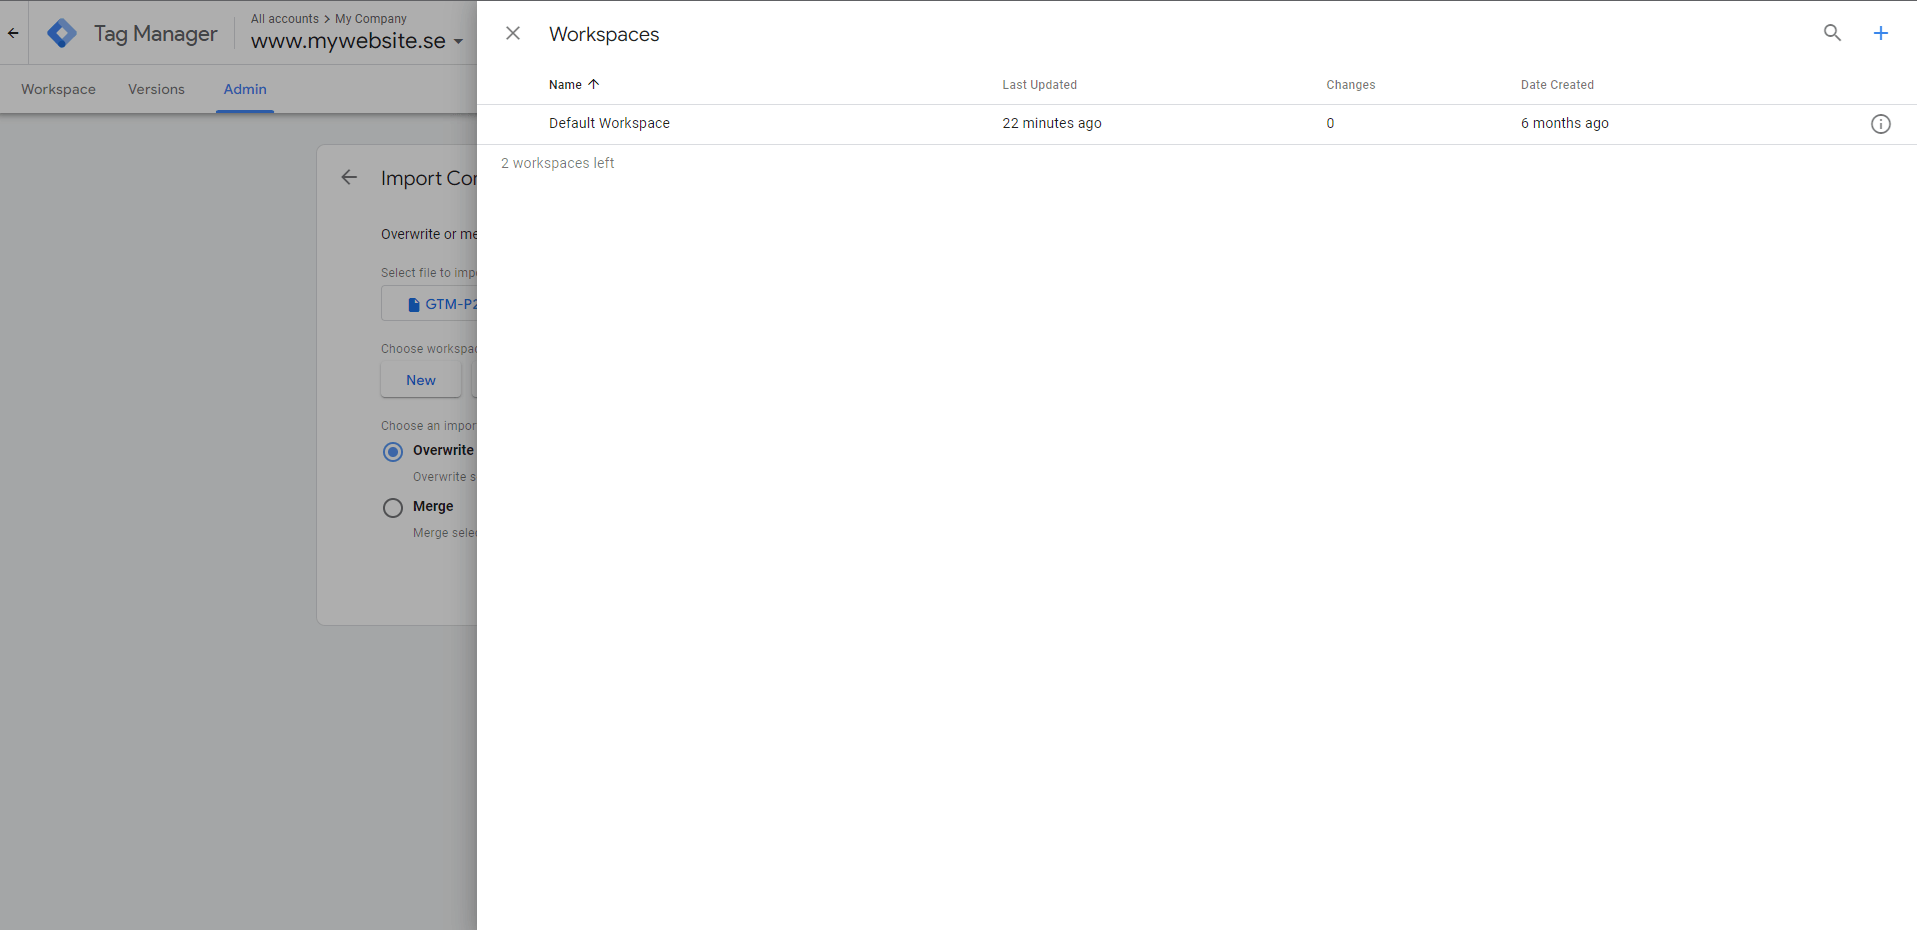
- First, start by visiting the Admin tab from the GTM navigation bar. If you log in to GTM and end up in the Workspace section, you will find the Admin tab on the right-hand side.

- By doing so, you will be directed to this menu (see the image below). In the right column, there is an option called Import Container. That is the option you need to select in order to proceed.
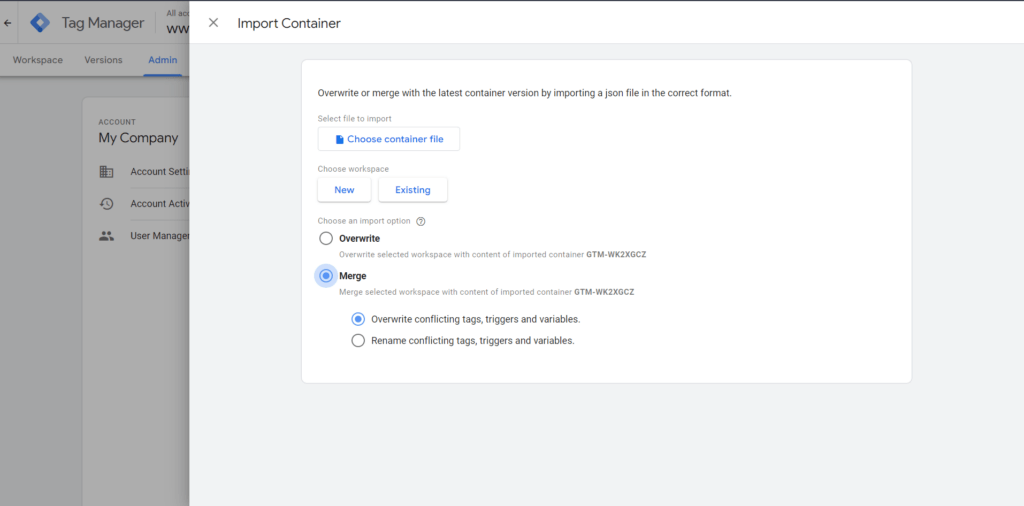
- Next, you will be presented with a few options displayed in the following image that will be explained one by one below.
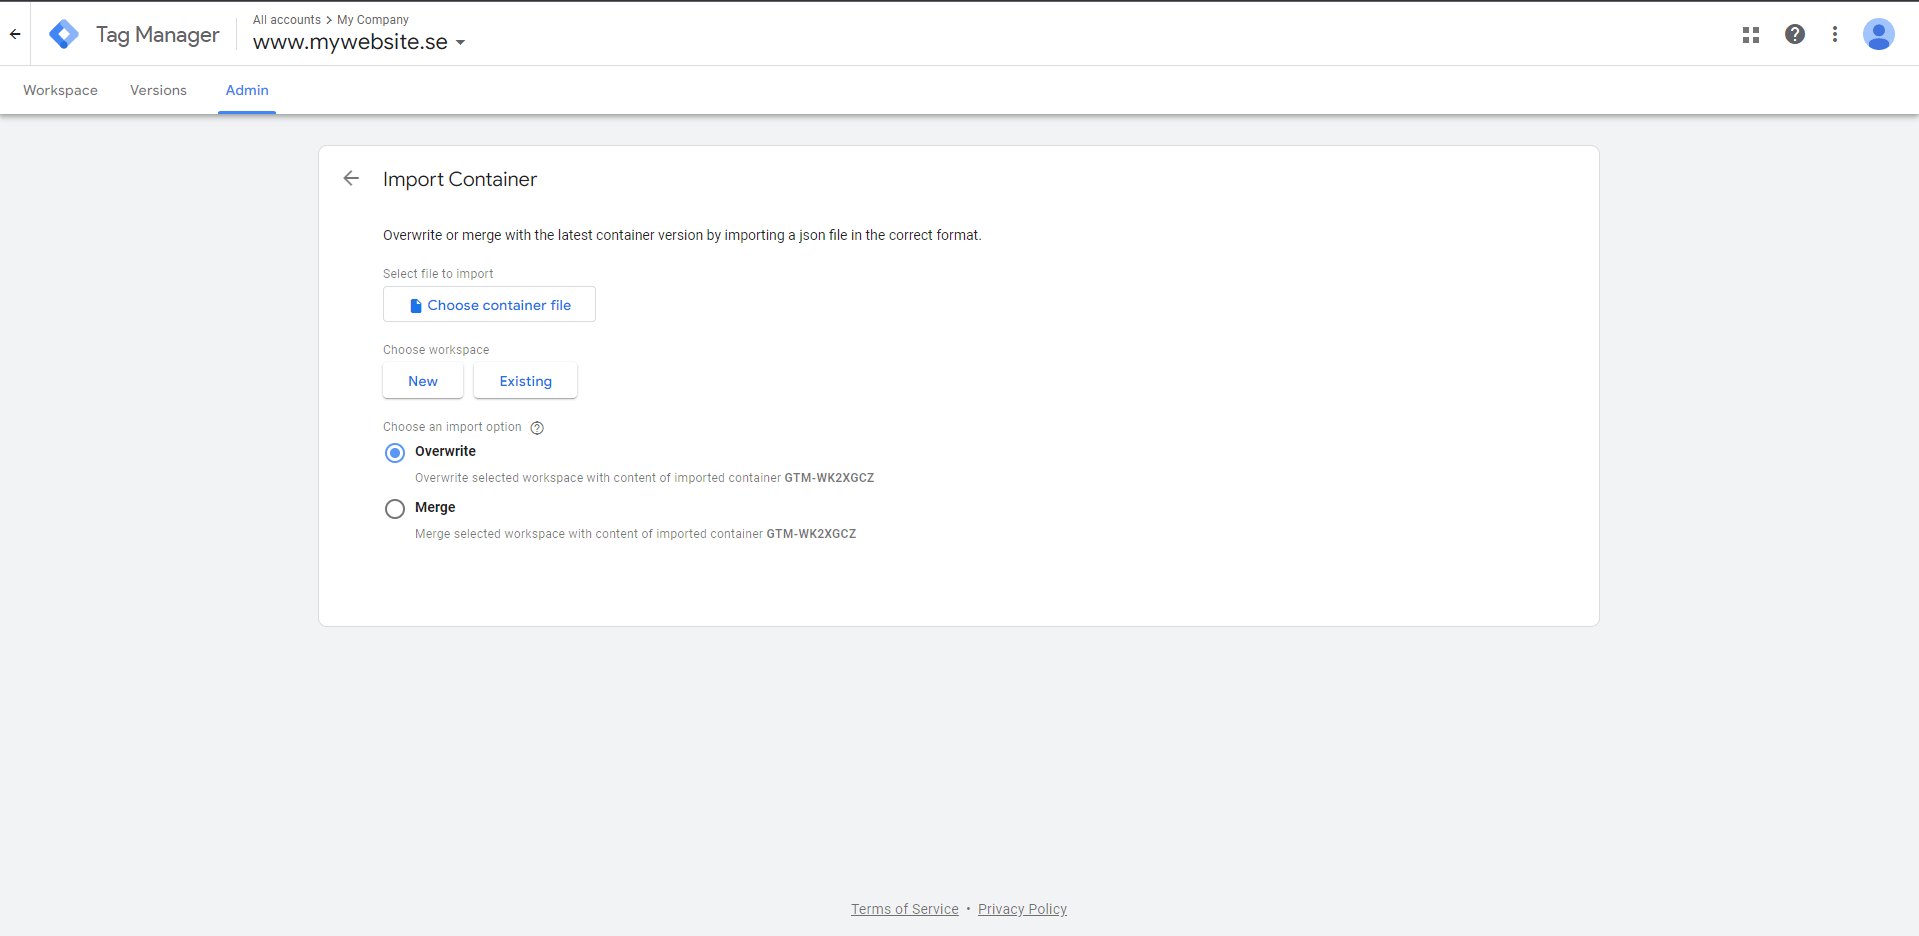
- Select a file to import → Click the Choose container file button and select the .json file. appropriate for you.
- Choose workspace and then → Select Existing and Default Workspace.
- Choose an import option:
When configuring the Data Talks Web tracking service, select Merge. Then, in the Merge option, select Overwrite conflicting tags, triggers, and variables.
Depending on your configuration case, the amount of Modified and New Tags, Triggers, and Variables may vary from the image.
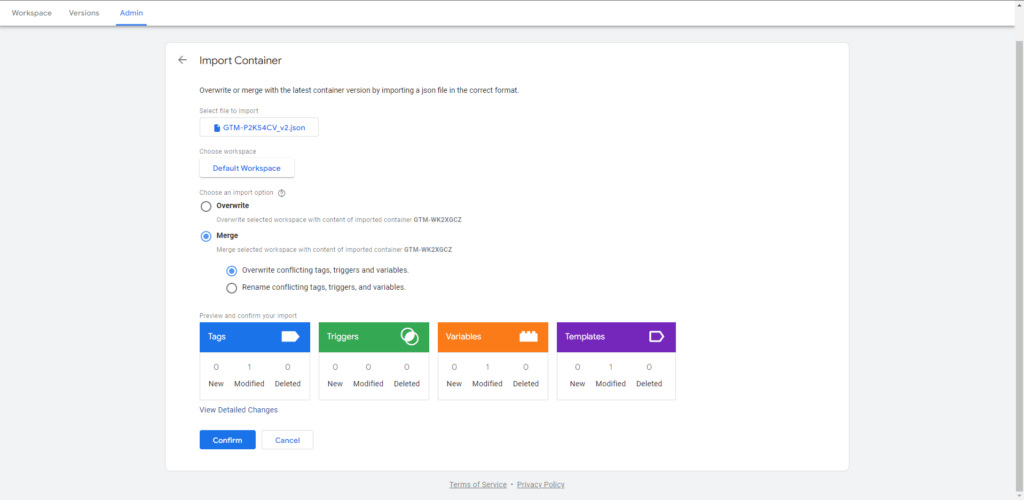
- Finally, select Confirm.
3-2. Final Changes #
There are a few changes you need to make in order to configure the container. Depending on the actions/tags you want to include in the container, you will need to make the following changes.
NOTE: The change included under Page View is required for every type of configuration.
Page View #
In the Variables menu → choose User-Defined Variables, and then → choose Snowplow Analytics Settings. Here, we then need to change the value of the Application ID.
Application ID #
Each domain you configure in the CDP will receive an application ID (app ID), a unique identifier which we will use to recognize and connect the visits to your site(s). The app ID is created automatically in the portal once you configure your domain on the Web Tracking page in the portal (see image below).
User Login #
For User Login, you can follow the same instruction as above for Page View. In addition, you need to add one more script to your website. See this script below. Once you have added the script, please contact your Customer Success Manager to finalize the data import to the CDP.
window.addEventListener("load", function(){
              window.dataLayer = window.dataLayer || [];
              window.dataLayer.push({
                    "event" : "login",
                    "userId": "email-address-value-in-string-format"
                });
            });
Form Tracking #
The Data Talks web tracking solution allows you to connect contact forms from your website to the CDP, and collect information your supporters submit through those forms. To achieve this, you need to perform a few simple configurations in your Google Tag Manager account.
- Make sure that the base tracker file added to your GTM is the correct one
- Set your Triggers in GTM
- Configure the attributes in your form in the Variables section of GTM
- Contact your Customer Success Manager for the final touches
- Tracking File:
You need to make sure that the correct file was selected in Step 3-1 (see above). You will need Pageview+Forms or Pageview+Login+Forms file being imported into your Google Tag Manager account, dependent on whether you also want to track user logins on the site.
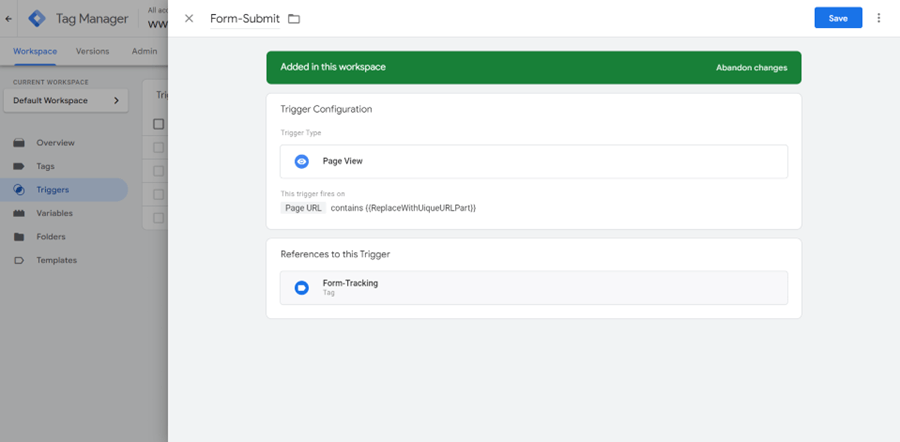
- Triggers:
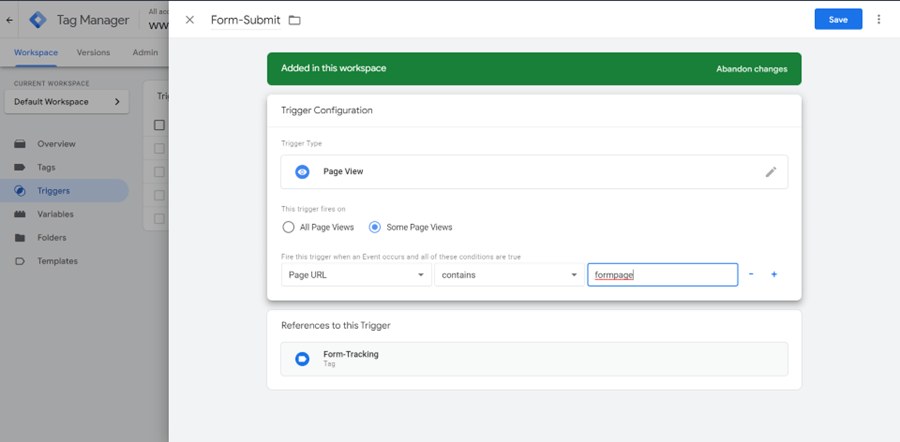
From the Triggers menu, choose Form Submit. You need to change the third value ({{ReplaceWithUiqueURLPart}}) to a unique word contained within the page URL of the form you want to track. A unique word means that only the URL with the form includes this word, no other URL on the website.
Assuming the form we want to track is the one displayed in the following picture
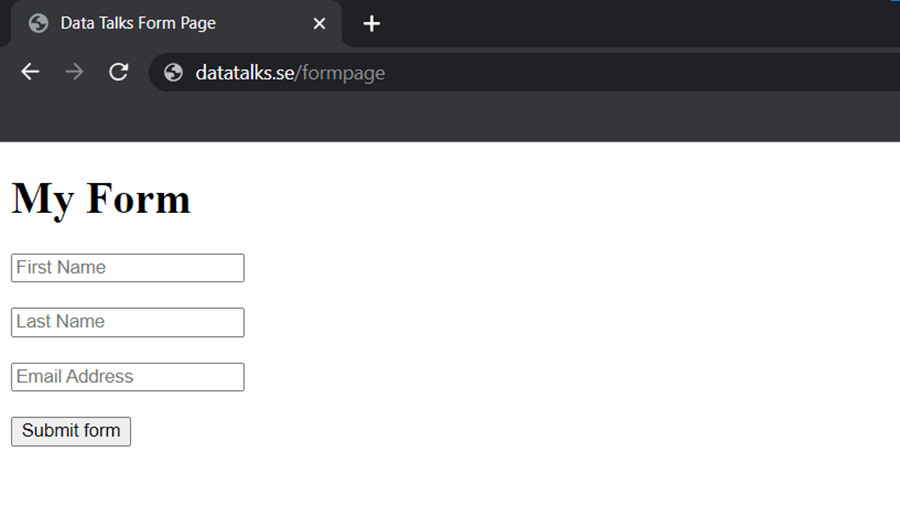
Then the unique word we could use is the “formpage”.
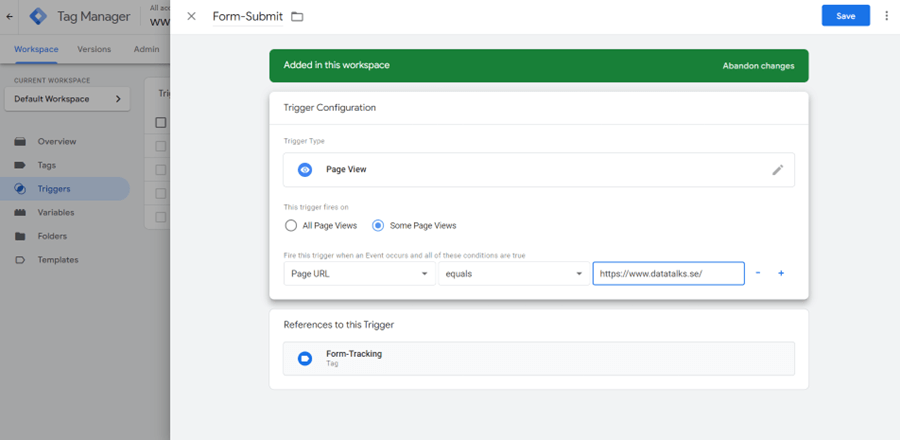
If the form is hosted on a webpage where no unique word can be used for example because the form is hosted on your homepage, you need to change the second option from contains to equals and instead of a word on the third field append the whole URL of your page, such as https://www.datatalks.se/.
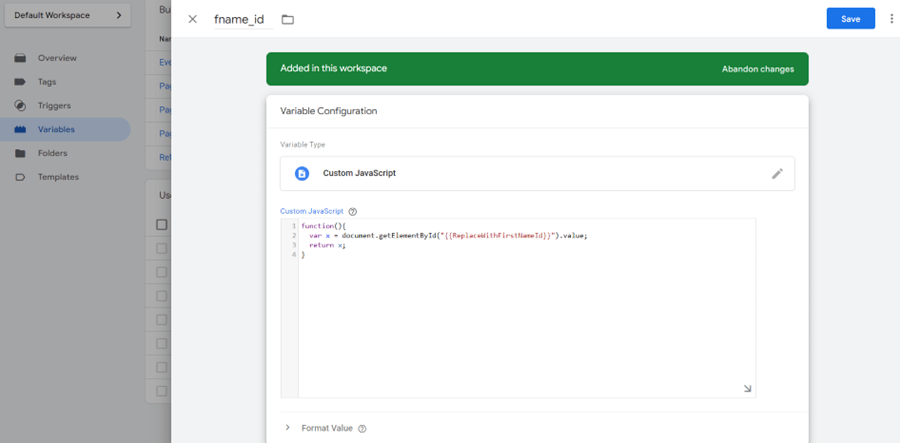
3. Variables:
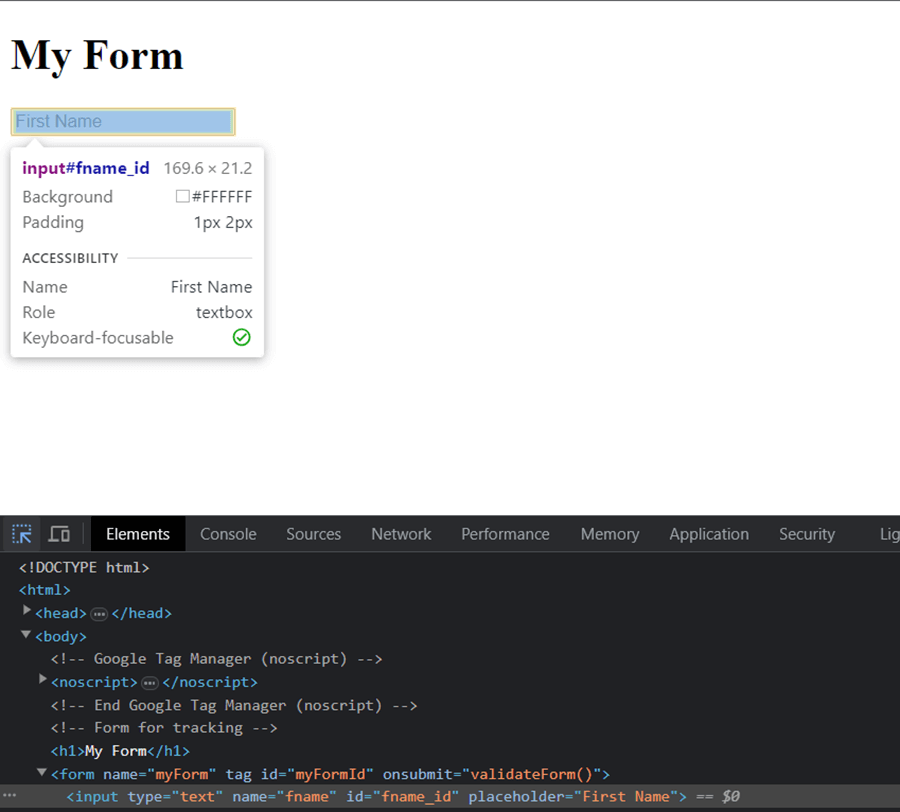
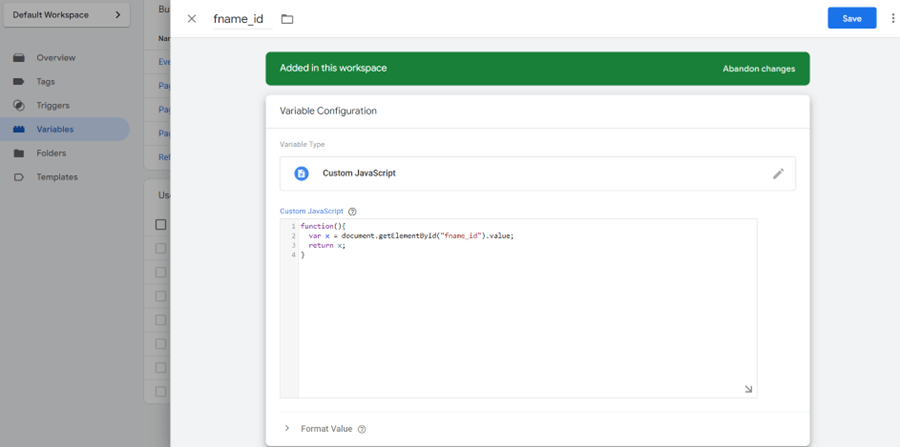
Using the Developer’s Tool of your browser (by pressing Ctrl +Shift +J for Windows and Cmd + Option + J for Mac) under the Elements tab, select the arrow icon from the top left corner and then select the form field we want to identify. That way we can access the id values of the fields. It is important for the identification of the visitor to fetch the following values using the variables in GTM.
- fname_id
- This variable is used to capture the first name from the form. We need to assign the id from the corresponding field in the website’s form.
The exact same process should be followed for lname_id and email_id variables.
- lname_id
- This variable is used to capture the last name from the form. We need to assign the id from the corresponding field in the website’s form.
- email_id
- This variable is used to capture the email address from the form. We need to assign the id from the corresponding field in the website’s form.
If you cannot find the ID fields for the form fields, please contact your Customer Success Manager.
Depending on the type of form, we might need to exclude some fields. The previously mentioned variables are required for a form containing all of the corresponding fields. If the form requires only the email address (subscription/newsletter form) we need to take a different approach: instead of filling the variable’s value with an id for the first name and the last name, we will simply leave it as an empty string.
So instead of replacing the value like this:

we will configure it with modifying the code to “document.getElementById(“”).value.

Once your Contact form is configured through Google Tag Manager, please contact your Customer Success Manager, so that the final configurations are made in your CDP account and data can start being ingested.
3-3 Publishing Changes #
Once you have Uploaded the required file to your Google Tag Manager account (Step 3-1) and done the additional changes (Step 3-2), you need to finish the configuration by “Publishing” the changes in your GTM container.
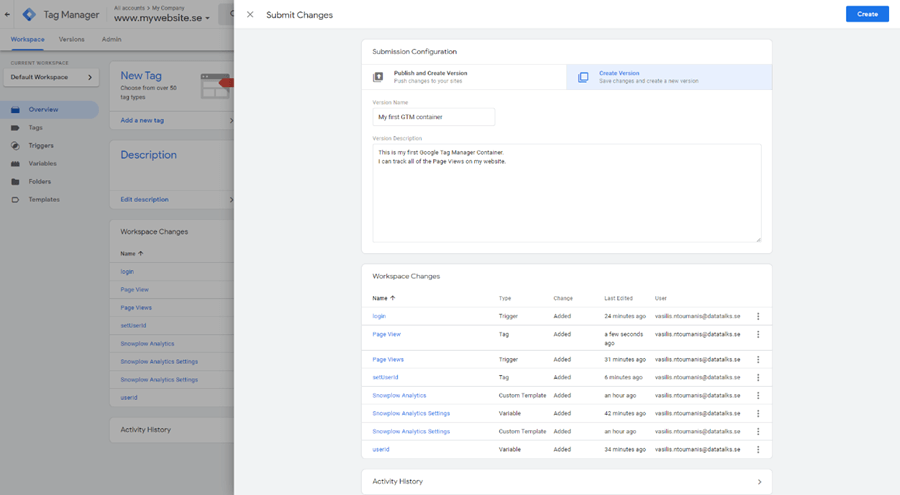
- Click on “Overview” in the left side menu and then click on “Submit” in the top right corner of the page

2. A new window appears under the heading “Submit Changes“. Here, you will need to fill the Version Name with an appropriate name for our configuration (something that helps you remember this action in the future). As an optional step, you can also add a description, where you describe what the changes included, e.g.: “Data Talks web tracking configuration”. You finish this step by clicking “Create“.
3. After the version is created, you need to click on the 3-dot menu within the version page at the top right corner and select “Publish“.

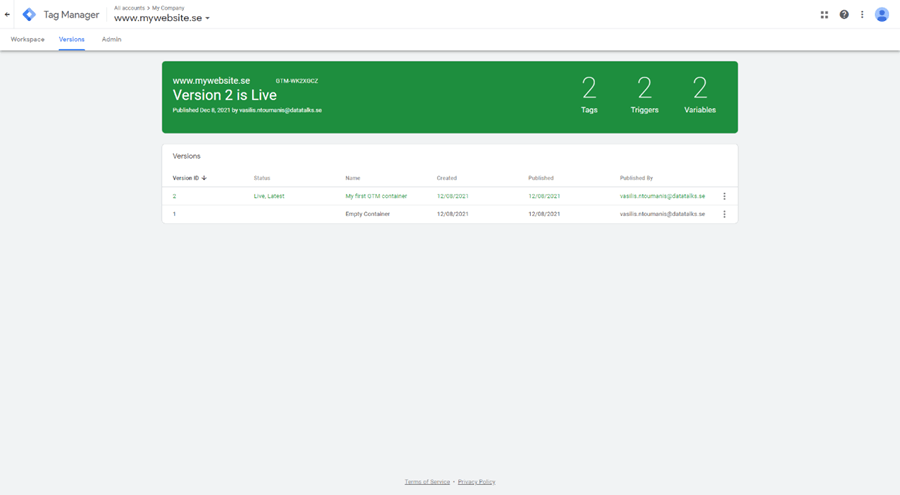
4. You should see a similar “Success” page to the screenshot below. If it is “Live“, then your changes were processed correctly. Should you have concerns or questions after this step, or would you notice any functional issues, please contact your Customer Success Manager.
Cookie information #
The Data Talks Web tracker service uses 3 types of cookies as described below.
| Name | Type | Expiration |
|---|---|---|
| spid | First-party Cookie | 1 year |
| spses | Session Cookie | Per session |
| DTCookie | First-party Cookie | 1 year |
The data each cookie collects are:
- spid (essential)
- ID for the user
- Domain visits counter
- Timestamp from first visit
- Timestamp from last visit
- Session ID
- spses (essential)
- Used to identify if the user is in an active session on the website or if this is a new session for a visitor (i.e. cookie doesn’t exist or has expired)
- DTCookie (optional)
- User’s identification provided by a web tracking feature
All cookies are being updated upon revisiting the website. It would have to be 1 year of inactivity (not returning to the website) for the cookie to expire. After its expiration and if the same user visits the website, the system would detect a new visitor instead of a returning and a new cookie will be assigned to them.
*A Session is considered the time when a user remains active within the website. In case the user becomes idle for more than 30 minutes, the active session is considered terminated. In the event the user visits the page again, a new session will begin, therefore a new spses cookie will be created.
Cookies installed on websites are the responsibility of website owners, including obtaining the necessary consent(s) from their visitors. The website owners are further required to provide information to visitors about how their visitor data is collected and used. These requirements vary between locations, hence, it is advised that you consult your legal representatives so they stay in line with your local data regulations.
For further information about the Data Talks cookies, please turn to your Customer Success Manager.